So you have one part of a picture that you want to crop out from the rest, and you’ve heard Photoshop is the way to go, huh?
Well, it is. Here is quick how-to:
There are a lot of reasons to crop (or cut / rotoscope / remove) things, and it’s a fairly straightforward process. As a matter of fact, once you understand how to use a few basic tools, getting a great end-result is more about having patience than anything else.
Here’s the thing: A lot of the tutorials on this topic feature pictures with simple, solid backgrounds which allows for the use methods that aren’t very applicable in common situations. If you try and follow these you’ll end up with a lack of results and an abundance of frustration.
**cough, Magic Wand Tool, cough**
Anyway, let’s get started.
Step 1: Pick your pic.
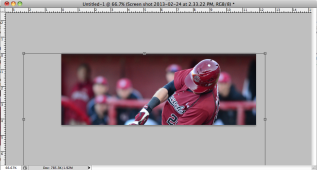
In honor of the South Carolina Baseball Team pitching its first no-hitter since 1978 and LB Dantzler starting the year something like 23 for 21 with 26 homeruns (don’t worry about logic), I went over to TheBigSpur.com and grabbed one of my good friend Juan Blas’s pictures.

Photo by Juan Blas
There are a lot of uses for this technique, but sports are one of the best. This specific picture is good because it presents a case where some of the figure’s edges are crisp:

While others are not:

It also (as I said before) gives us the challenge of cropping a figure who is not on a solid color background – if it was, you could check out the Magic Wand Tool or the ‘Content-Aware’ feature on Photoshop CS5 and later.
Step 2) Figure out what size you want your picture to be.
Sure, you can open your picture in Photoshop first, but then you typically have to deal with resizing the image to fit whatever project you’re working on after you’ve completed everything – and that’s just a pain. For this project, I created a canvas that is 851 x 315 Pixels.
Why 851 x 315? That’s the size of a Facebook Timeline picture.
If you have a large picture (ideal), Photoshop will automatically size that photo to fit your canvas – don’t let it do that yet. Expand the file by pressing the ‘v’ key to select the ‘move tool’ (most of the world knows this as a pointer), clicking on the edge of the picture, holding down the ‘shift’ key to keep your proportions intact, and dragging. Once you have the size you are looking for, click anywhere else and allow it to apply the transformation.
Just because you can’t see it, doesn’t mean it isn’t there.
The next step is to duplicate your layer by right-clicking on it and hitting ‘Duplicate Layer’ – then click the eye symbol next to that new layer to hide it. It’s a good idea to always have an unedited layer hidden, just in case you want to start over.
Step 3) Resist the urge to grab the ‘Eraser Tool’
Step 4) The third tool from the top is called the ‘Lasso Tool’, click that and hold…then select the ‘Polygonal Lasso Tool’.
Step 5) Cropping the ‘crisp’ areas of an image.
Zoom in on your figure, and I mean WAY in (use Command and then the ‘+’ button on a Mac), and begin selecting the edge of your figure. Carefully draw around the edges for a few seconds, then zoom out.
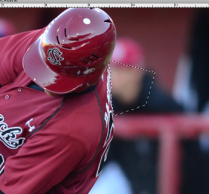
Selected area of your composition
Select away from your figure, then go back to where you started. Once you connect that Polygonal Lasso Tool (look for the little circle that appears when you’re close to clicking on the exact spot you started) it will select that area (show on left).
Hit ‘delete’ (note: if it says the area is ‘not directly editable’, right click on that layer and hit ‘rasterize layer’, then hit delete.)
This creates a crisp, sharp edge
If you run out of image, hit ‘v’ on your keyboard to select the Move Tool, then drag the image around until you see the next area you want to crop.
Think of your canvas as a window – it offers you just a little bit of visibility, but you know there is more out there.
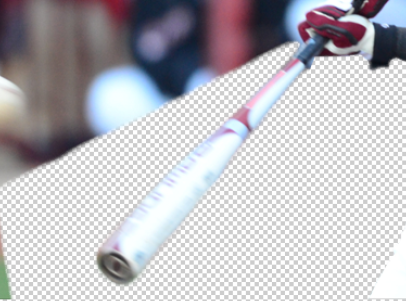
Step 6) Cropping the ‘very blurry’ areas of a figure (bat).
This is a challenge because using the Polygonal Lasso Tool, with its edges currently set at such a sharp level, looks odd.
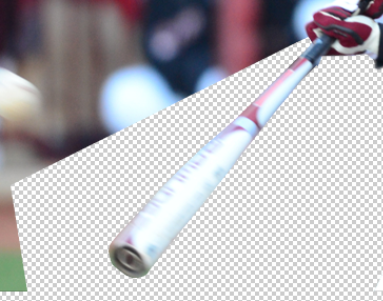
Just cropping around a blur leaves a harsh, unnatural edge.
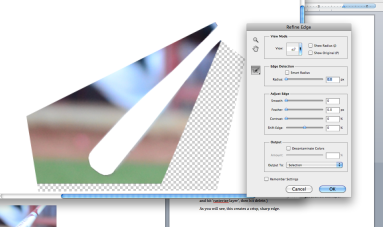
Using ‘Refine Edges’ to feather the harsh edge
Better. Take the ‘Blur Tool’ to the edges of your object for further improvement.
What you want to do is select the area you want to crop out, and then hit the ‘Refine Edges’ button. Play around a little with the settings in there and you will immediately see what this can do (or I can just tell you it, basically, gives you a lot of control over edge feathering).
I’m not covering it in this tutorial, but the Refine Edges component of Photoshop also works great for figures with a lot of hair (or blades of grass, trees branches, etc…), particularly the ‘Radius’ trigger.
Step 7) Cropping the ‘slightly blurry’ areas of a figure (arms).
For these areas, cut them out using the Polygonal Lasso Tool, then grab the ‘Blur’ tool – it’s the one that looks like a rain drop. Set the strength to about 20% and trace along the edge of the figure; this will reduce those harsh edges.
Notes:
– If you need help understanding the tools, click here.
– If you really want this to be perfect, put the figure over a solid black or white background, then fine tune.
Questions? Comments? Tweet at me: @JustinKing224
– Justin